tl;dr: I made a program called HiveKit, that let’s you expose the main features from the Hive Active Heating system (heat, boost heat, & hot water) to HomeKit. This let’s you control these features via Siri on your watch or phone.

If you’re in the UK and wanted a “Smart Thermostat” for your home, chances are you did your research on Nest, saw the few options at B&Q, and then decided to succumb to the calls from British Gas and get the Hive Active Heating system installed.
Why? Well, I chose Hive because:
- At the time, Nest didn’t support triggering or scheduling Hot Water, which is a must for most homes in the UK (latest Nest does, but I haven’t seen many reviews)
- B&Q’s smart thermostat’s seemed very much not smart
- The Hive team seemed to understand how heating worked in the UK (as you’d expect) and, while they are likely to always lag behind in features with Nest and friends, I like that I can count on them to make sure they work well with the BG boiler, switches, etc
And so, after waiting less than a week, I had the Hive installed and my home was smarter than it’d ever been.
Smart-ish Home
After a few months of having the Hive, and it working great (good job Hive people!), I got itchy fingers and wanted to tinker with it. I had seen people demoing Google Now working with Nest, and Apple was waxing lyrical about how Siri could now change the temperature of your home and such things.
I investigated HomeKit and realised that it wasn’t likely that I could shout at Siri any time soon to switch on the heating; the architecture of HomeKit (both the protocol and the certification), meant that it was a long process for existing hardware to be upgraded with HomeKit (and they would have to be upgraded). It seemed more likely that the next version of the Hive Hub would contain the necessary bits and it would have to be an upgrade once it was available.
However, it was clear that people had reverse-engineered the protocol and were making unsupported devices work with HomeKit. Projects like homebridge had entire ecosystems built around unsupported accessories. However, I do enough Node.js in my day job, so I wanted to see if I could find something which did the same in my new favourite language, Go.
Luckily, @brutella was being awesome while I was procrastinating and he released HomeControl, which is a complete implementation of the HomeKit protocol in Go. Using that as my base, I started to unwind the Hive.
The Hive Active Heating System
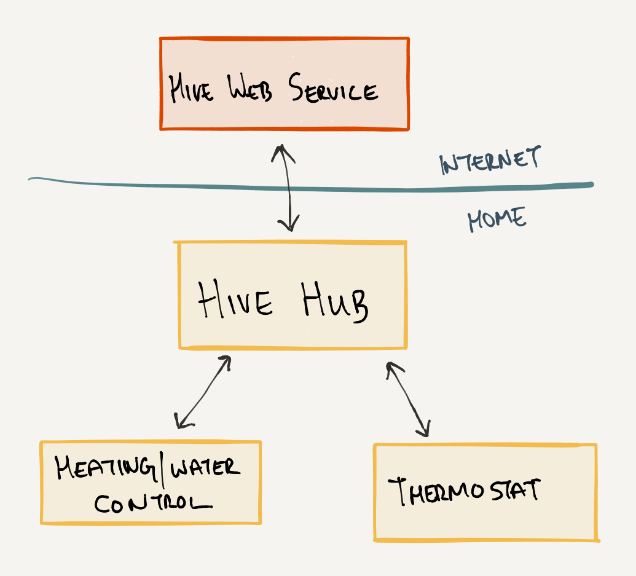
The Hive consists of three devices:
- The Hive Hub is the gateway to the Hive Home web service and, as far as I can tell, a coordinator between the other two devices.
- The Hive Control Unit is the switch that sits next to your hot water tank and sends the magic signals to switch on either the heating or hot water, depending on what the hub wants.
- The Hive Thermostat is the physical UI of the system, where you can turns things on/off, boost/stop-boost, etc etc. It’s just another client to the Hub & Service.
From what I can tell, the Hub syncs with the web service and therefore, if the internet goes down, it still has a copy of the current schedule etc and continues as normal until it’s back up. The simple overview looks like this:
The best way to control the Hive then would be through the Hub, unfortunately it’s communication protocols are undocumented. The second best way to control the Hive system would be through the Hive Web Service. Unfortunately, it again doesn’t have a documented API, and some of the existing libraries that people had written didn’t seem to work correctly.
Thankfully, however, the API is simple enough and after some head-scratching in the Chrome dev tools window, I was able to extract the portions of the API I needed into a little hive library that HiveKit uses. If you choose to explore the Hive service API, ‘Omnia’ will be you new favourite word.
HomeKit And HomeKit Apps
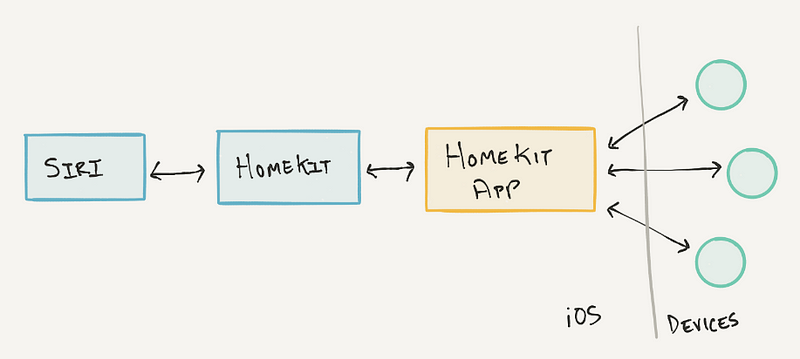
Once I could talk to the Hive, the next thing was using HomeControl to implement the HomeKit protocol. However, even if I did this, nothing would show up in iOS. This is because HomeKit on iOS isn’t an app, nor is it anything user-facing. Instead it’s best to think of it as a database of accessories, and an accessory would be something physical like a light switch, or outlet, or a Phillips Hue hub, etc.
This database needs to know which accessories are available, and for that you need to install an HomeKit App of your choice. These apps implement the necessary smarts to find and pair to accessories, register them with HomeKit, and then act as a gateway between the devices and HomeKit.
Once such app is Home by Matthias, who is also the author of HomeControl, which made HiveKit actually possible. I use Home myself and, in addition to providing the gateway for HomeKit, it also has some neat features like Apple Watch support and widgets for the notifications sheet in iOS.
The Wrong Kind of Heating
As I could now interface with the Hive, and understood HomeKit, I had to figure out how best to expose the features of the Hive. HomeKit is, as you’d expect, slanted towards how things work in California. Its version of a thermostat would be connected to an Air Conditioning unit (modes like off, heating, cooling, auto). This doesn’t quite map to the Hive, however I realised that implementing some of the thermostat features were enough to control the Hive in it’s normal mode (scheduled with a min temperature, and with intermittent boosts).
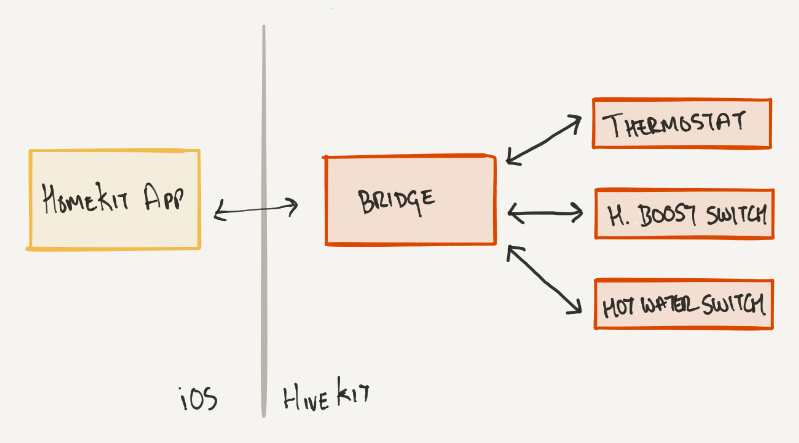
Speaking of boosts, one of the best features in Hive is the ability to boost the heating or hot water for a time period (normally an hour, but can be up to six hours). This isn’t something that HomeKit understands at all, so in the end I decided to map both the boost features into switches. This allowed them to be controlled more naturally via Siri too.
Something I hadn’t thought of was how these accessories would show up in an app like Home, and what would be the relation between them. After some testing, I realised that it was best to have a ‘bridge’ accessory as well, which would call itself ‘Hive Hub’, and link to the thermostat and two switches. While it has no features itself, it gives a nicer experience when pairing and also makes sure the relationships are accurate.
Pairing And Setup
Once you’ve downloaded and built HiveKit (instructions here), you’ll need to run it in a terminal with the appropriate options:
$ ./hivekit -username me@example.com -password FooBar2000 -pin 80808080 -verbose
2016/01/16 21:04:30 [INFO] Accessory IP is 192.168.1.14
And once it’s alive (if you see IPv6 errors, those are fine to ignore), you can go through the setup process on your iPhone/iPad. The images below are the setup process using the Home app, as mentioned before. The process if you’re using another app will vary.
“Hey Siri, set the temperature to 24 degrees“

Checkout HiveKit!
:)